

I still remember the first time I folded a too-full tortilla and watched the cheese leak out as it hit the hot oil — that charred, cheesy edge made me a chimichanga believer. These chicken chimichangas are a simple, crowd-pleasing way to turn leftover or rotisserie chicken into a crunchy, cheesy handheld dinner that’s perfect for weeknights, casual gatherings, or game-day snacks. If you want another fast chicken option for busy nights, this recipe pairs well in spirit with a quick skillet dish like 30-minute boneless skinless chicken thighs for a full-week recipe rotation.
Why you’ll love this dish
Homemade chimichangas give you all the crunchy, savory appeal of restaurant fried chimichangas but with control over spice, filling, and cooking method. They’re budget-friendly because a little chicken and cheese goes a long way, and they’re easily scaled for families or parties. Make them baked for a lighter weeknight dinner or fry a few for a special treat — either way you get melty Monterey Jack and bright salsa wrapped in a golden shell.
“Crispy outside, gooey cheese inside — these chimichangas became the go-to for our Friday nights. The salsa keeps them fresh, and everyone loves customizing toppings.”
Preparing Chicken Chimichangas
Step-by-step overview
- Shred cooked chicken and toss with cheese, salsa, and seasonings to make the filling.
- Spoon filling onto large flour tortillas, fold the sides in, and roll snugly to seal.
- Choose baking for an easier, lower-fat finish or shallow-fry for deep golden crunch.
- Serve immediately with fresh toppings like guacamole, sour cream, or pico de gallo.
This short roadmap helps you see how little active time the recipe needs: most of the work is assembly, and the oven or skillet does the finishing.
Gather these items
- 2 cups shredded cooked chicken (rotisserie or poached works great)
- 1 cup Monterey Jack cheese, shredded (or a blend of Jack and cheddar)
- 4 large flour tortillas (10–12-inch size)
- 1 cup salsa (mild, medium, or chunky depending on preference)
- 1 teaspoon ground cumin
- 1 teaspoon garlic powder
- Salt and pepper to taste
- Oil for frying (vegetable or canola) or cooking spray for baking
Ingredient notes: Use pre-shredded cheese to save time but freshly shredded melts better. If you want more heat, swap half the salsa for a chipotle or add 1/4–1/2 teaspoon chili powder.
How to prepare it
Step-by-step instructions
- If you plan to bake, preheat the oven to 375°F (190°C). Line a baking sheet with parchment for easy cleanup.
- In a mixing bowl, combine the shredded chicken, shredded Monterey Jack, salsa, cumin, garlic powder, and a pinch each of salt and pepper. Taste and adjust seasoning — the salsa often contributes salt and acidity.
- Lay a tortilla flat. Spoon about 1/2 cup of filling slightly below center. Fold the two shorter sides inward, then roll from the bottom edge up to enclose the filling, pressing firmly so it’s snug. Repeat with remaining tortillas.
- For baking: Place chimichangas seam-side down on the prepared baking sheet. Lightly spray each one with cooking spray or brush with a little oil for a golden crust. Bake 20–25 minutes until the tortillas are evenly golden and the cheese inside has melted.
- For frying: Pour oil into a skillet to a depth of about 1/4 inch and heat over medium until shimmering (about 350°F if using a thermometer). Fry chimichangas seam-side down first, turning to brown all sides, about 2–3 minutes per side. Drain on paper towels.
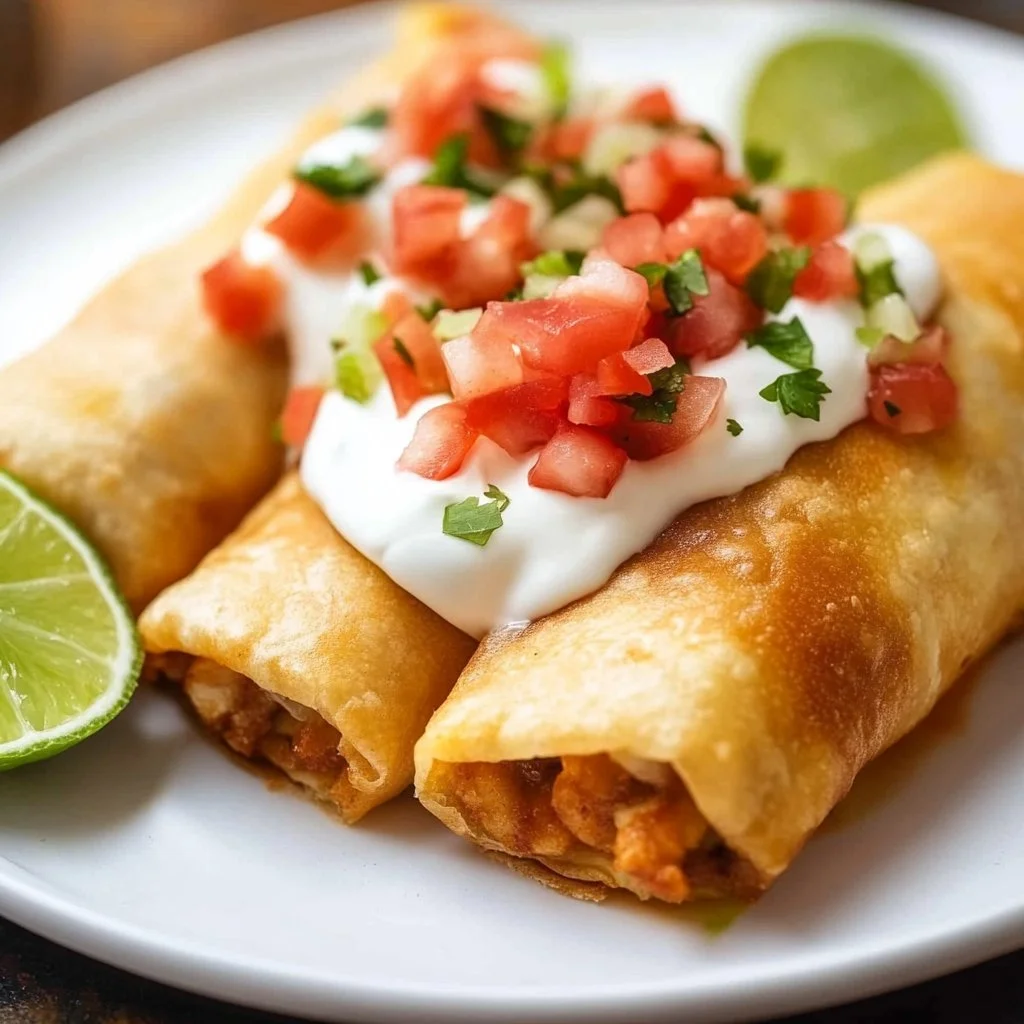
- Serve immediately with extra salsa, guacamole, or sour cream.

Best ways to enjoy it
Serve chimichangas hot so the exterior is crisp and the interior is molten. For plating, place one chimichanga on a plate, slice on the diagonal to show the filling, and spoon guacamole or a tangy crema beside it. Classic side pairings include Mexican rice, refried beans, a crunchy cabbage slaw, or a simple mixed greens salad with lime vinaigrette. For a heartier spread at a gathering, set up a toppings bar with pico de gallo, sliced jalapeños, shredded lettuce, cotija, and hot sauce. If you want a different protein inspiration, consider a grilled-chicken comfort plate like Alice Springs Chicken for a saucier pairing.
How to store & freeze
Refrigerate leftovers within two hours of cooking. Store chimichangas in an airtight container or wrapped tightly in foil for up to 3–4 days. To freeze, wrap each chimichanga individually in plastic wrap and place in a freezer bag; they keep best up to 3 months. Thaw overnight in the refrigerator before reheating.
Reheating tips: Reheat frozen or refrigerated chimichangas in a 350°F oven for 10–15 minutes (longer if frozen) until heated through and crisp. An air fryer at 350°F for 6–8 minutes also restores crunch. Microwaving is fastest but will soften the tortilla; if you must microwave, follow with a minute in a hot skillet to crisp the outside.
Pro chef tips
- Don’t overfill the tortillas. Too much filling prevents a tight seal and can cause splitting during frying.
- Press seams down when rolling and place seam-side down in the pan or on the baking sheet to keep them closed.
- For extra crispiness without deep frying, brush with a thin layer of oil and broil for the last 2 minutes of baking — watch closely to avoid burning.
- If your tortillas are cold, warm them briefly in the microwave or on a skillet so they fold without cracking.
- Use a light hand with salt; salsa varies in sodium and can make the filling salty if you over-season.
Recipe variations
- Vegetarian: Replace chicken with seasoned black beans, corn, and sautéed peppers, and add a little crumbled queso fresco.
- Smoky chipotle: Stir in 1–2 tablespoons chipotle in adobo for heat and smokiness.
- Cheesy ranch: Swap half the Monterey Jack for pepper jack and add a tablespoon of ranch seasoning for a tangy twist.
- Breakfast chimichangas: Use scrambled eggs, breakfast sausage, and cheddar; bake until set and golden for a portable morning meal.
- Low-carb: Use large low-carb tortillas or lightly crisp a collard leaf for a grain-free wrap.
Common questions
Can I use rotisserie chicken for the filling?
Yes. Rotisserie chicken is a great time-saver and adds good flavor. Just shred it, remove excess skin, and mix with the cheese and salsa as directed.
Should I bake or fry chimichangas?
Both work well. Baking is easier and lighter; frying gives the most authentic, deep-golden crunch. Choose baking for weeknights and frying when you want restaurant-style texture.
How long do chimichangas last in the fridge?
Stored in an airtight container, chimichangas will keep 3–4 days in the refrigerator. Reheat thoroughly until steaming hot before serving.
Can I make these ahead for a party?
Yes. Assemble chimichangas and keep them covered in the fridge for a few hours, then bake or fry just before guests arrive. For longer storage, freeze assembled chimichangas and cook from frozen (add extra oven time).
What oil temperature is best for frying?
Aim for an oil temperature around 350–375°F. If too cool, the tortilla will absorb oil; if too hot, the outside will brown before the filling is hot.
PrintChicken Chimichangas

Crunchy, cheesy chicken chimichangas made with rotisserie chicken, perfect for weeknights or gatherings.
- Prep Time: 15 minutes
- Cook Time: 30 minutes
- Total Time: 45 minutes
- Yield: 4 servings 1x
- Category: Main Course
- Method: Baking or Frying
- Cuisine: Mexican
- Diet: Gluten Free
Ingredients
- 2 cups shredded cooked chicken (rotisserie or poached)
- 1 cup Monterey Jack cheese, shredded
- 4 large flour tortillas (10–12-inch size)
- 1 cup salsa (mild, medium, or chunky)
- 1 teaspoon ground cumin
- 1 teaspoon garlic powder
- Salt and pepper to taste
- Oil for frying (vegetable or canola) or cooking spray for baking
Instructions
- If baking, preheat the oven to 375°F (190°C) and line a baking sheet with parchment.
- In a bowl, combine the shredded chicken, Monterey Jack, salsa, cumin, garlic powder, salt, and pepper. Adjust seasoning to taste.
- Lay a tortilla flat and spoon about 1/2 cup of the filling slightly below center. Fold the sides inward and roll tightly to seal.
- For baking: Place chimichangas seam-side down on the baking sheet, spray with cooking spray, and bake for 20–25 minutes until golden.
- For frying: Heat oil in a skillet to medium (about 350°F). Fry chimichangas seam-side down for about 2–3 minutes per side until golden. Drain on paper towels.
- Serve immediately with toppings like salsa, guacamole, or sour cream.
Notes
Use pre-shredded cheese for convenience, but freshly shredded melts better. For added heat, consider using chipotle or chili powder.
Nutrition
- Serving Size: 1 chimichanga
- Calories: 350
- Sugar: 5g
- Sodium: 400mg
- Fat: 12g
- Saturated Fat: 4g
- Unsaturated Fat: 6g
- Trans Fat: 0g
- Carbohydrates: 45g
- Fiber: 3g
- Protein: 15g
- Cholesterol: 30mg


